|
|
WAITING FOR THE
SHADOW
Solar Eclipse Observing and Photography - Joseph Cali
|
To photograph a solar eclipse, you will ideally need a camera with
manual settings and a solar filter (ND5 filter -100000x light
reduction). These can be purchased from astronomy shops and suppliers.
Camera stores generally don't sell suitable solar filters. You can make
your own safe solar filter holder to suit your camera but you must buy
and use a safe and certified solar film that you purchase from a
reputable supplier.
Detailed instructions for making your own solar filters like this can be found at
https://joe-cali.com/eclipses/EQUIPMENT/solarfilters.html but you must buy and use certified solar film.
Instructions for safe visual observation of a solar eclipse can be found here https://joe-cali.com/eclipses/Eye_Safety/index.html
The easiest pictures to take are of totality using a wide angle lens
with camera set to AUTO and compensation set to -1.5eV. This is covered
at the end of the article.
Hints!
• Keep it simple and enjoy the experience!
• Watching a total solar eclipse with your own eyes is a very special experience. Do not forget to look!
• Any camera or video will give some photographic
record of the event. Match the style of image to your equipment.
• Do not buy new equipment just before the eclipse. Totality is not the time to be reading a camera manual.
• Bright camera/phone displays will reduce dark
adaptation of your eyes & spoil your view and experience of
totality.
|
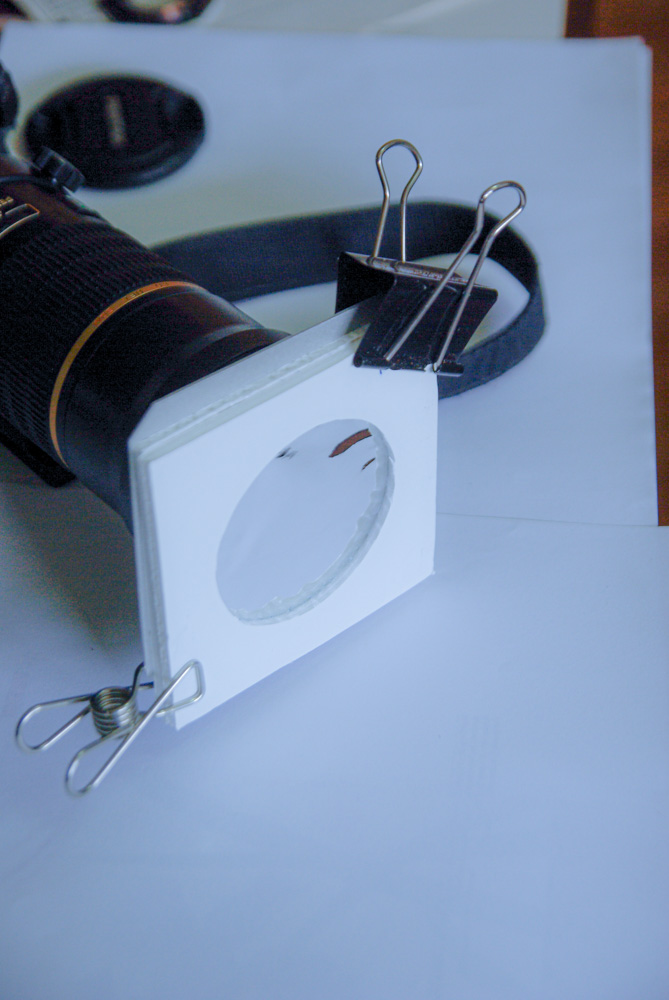
1. Attach the ND5 solar filter to the front of your
lens or telescope to protect your camera and your eyes from the intense
light of the sun during the eclipse. The fitting needs to be very
secure so that it can't accidentally blow off, but also easy and quick
to remove a few seconds before totality. The type shown in the construction
tutorial meets these requirements.
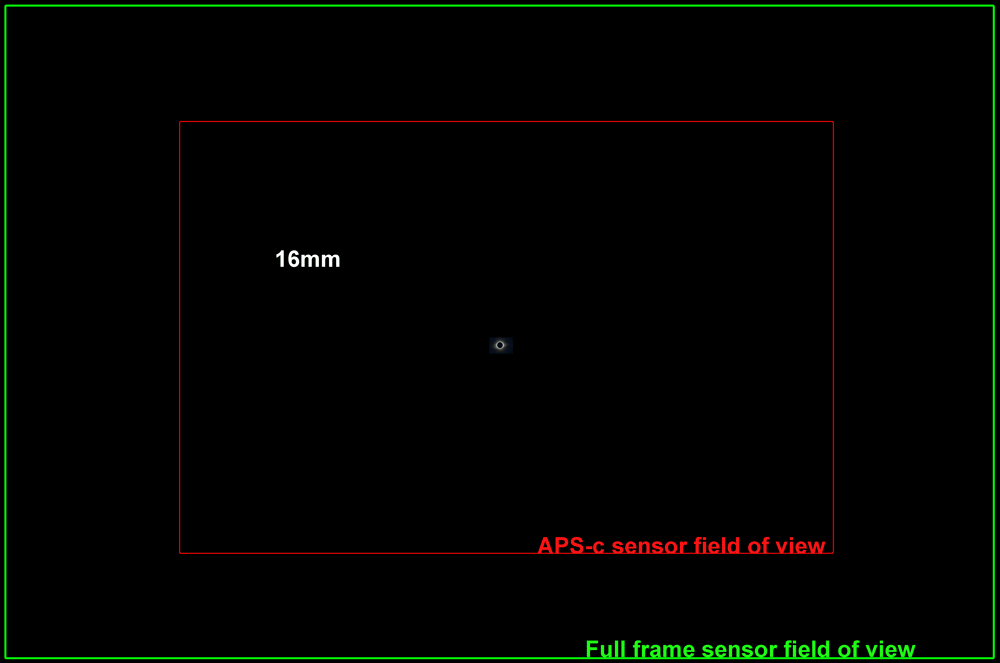
2. If you plan to photograph the corona, the
Sun's outer atmosphere, in detail, you will need to use the longest
telephoto lens you have and you may need to increase your ISO to
capture the features of the corona. You can capture the total eclipse,
corona, lunar shadow on the sky, and some landscape, with a wide-angle
lens but the fine details of the corona will be lost. This animation
illustrates the changing size of an eclipse image with focal length.
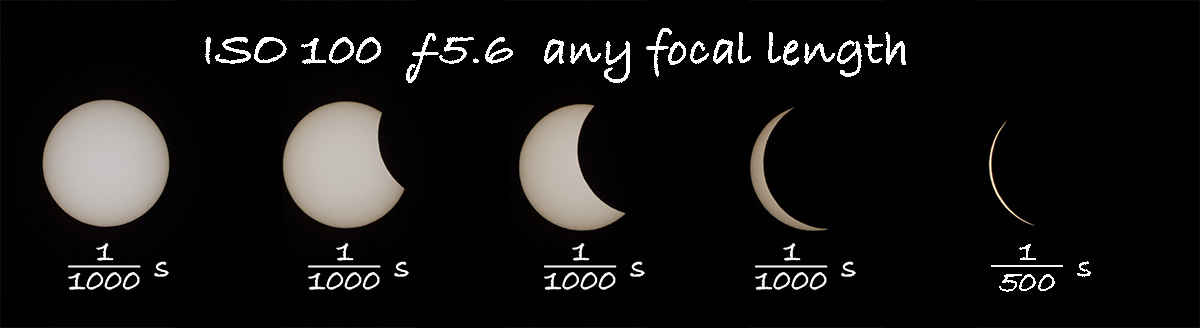
3. Set your camera to manual mode, and adjust the aperture to about f5.6.
4. Set your ISO to a low value, around 100-200, to avoid noise in the image.
5. Set your shutter speed to a relatively fast
value,
around 1/1000 s, to freeze the motion of the eclipse. Use
this setting for most of the partial phases of the eclipse. You can
test this long before the eclipse on the uneclipsed Sun to check if the
exposure is correct.
However, when the crescent becomes extremely thin, increase the shutter
speed to
1/500 s.
6. Use a tripod or other stable surface to keep your camera steady while taking the photo.
7. To frame the shot, it is important to have the Sun
in the centre of the frame, and to adjust the focus on the Sun before
the eclipse begins.
8. During the eclipse, periodically check your
camera's live view or use the camera's LCD to check the focus,
composition and exposure of the shot and make any necessary adjustments.
9. During the total eclipse phase, the light level
drops significantly. YOU MUST remove the solar filter about 15-30 s
before totality and replace it 15-30 s after totality otherwise your
images of totality will just be blank frames. Experienced
eclipse photographers take a very wide range of exposures to capture
the intensity differences between the very bright inner corona,
prominences, and diamond ring, and the outer corona, some 10000-15000
times fainter. Typically using a telephoto lens or small telescope they
take a picture at ISO100 f5.6 at every shutter speed from 1/4000s to
1s. This requires a very dedicated and careful technique or computer
control of the camera. After the eclipse, the exposures are combined
into a HDR image. The sequence below shows you what part of the corona
is captured at different shutter speeds. These images were captured
with a 300mm lens but the focal length of the lens only affects the
overall image size. The extent or spread of the recorded corona
relative to the diameter of the Moon is a function of the overall
exposure.

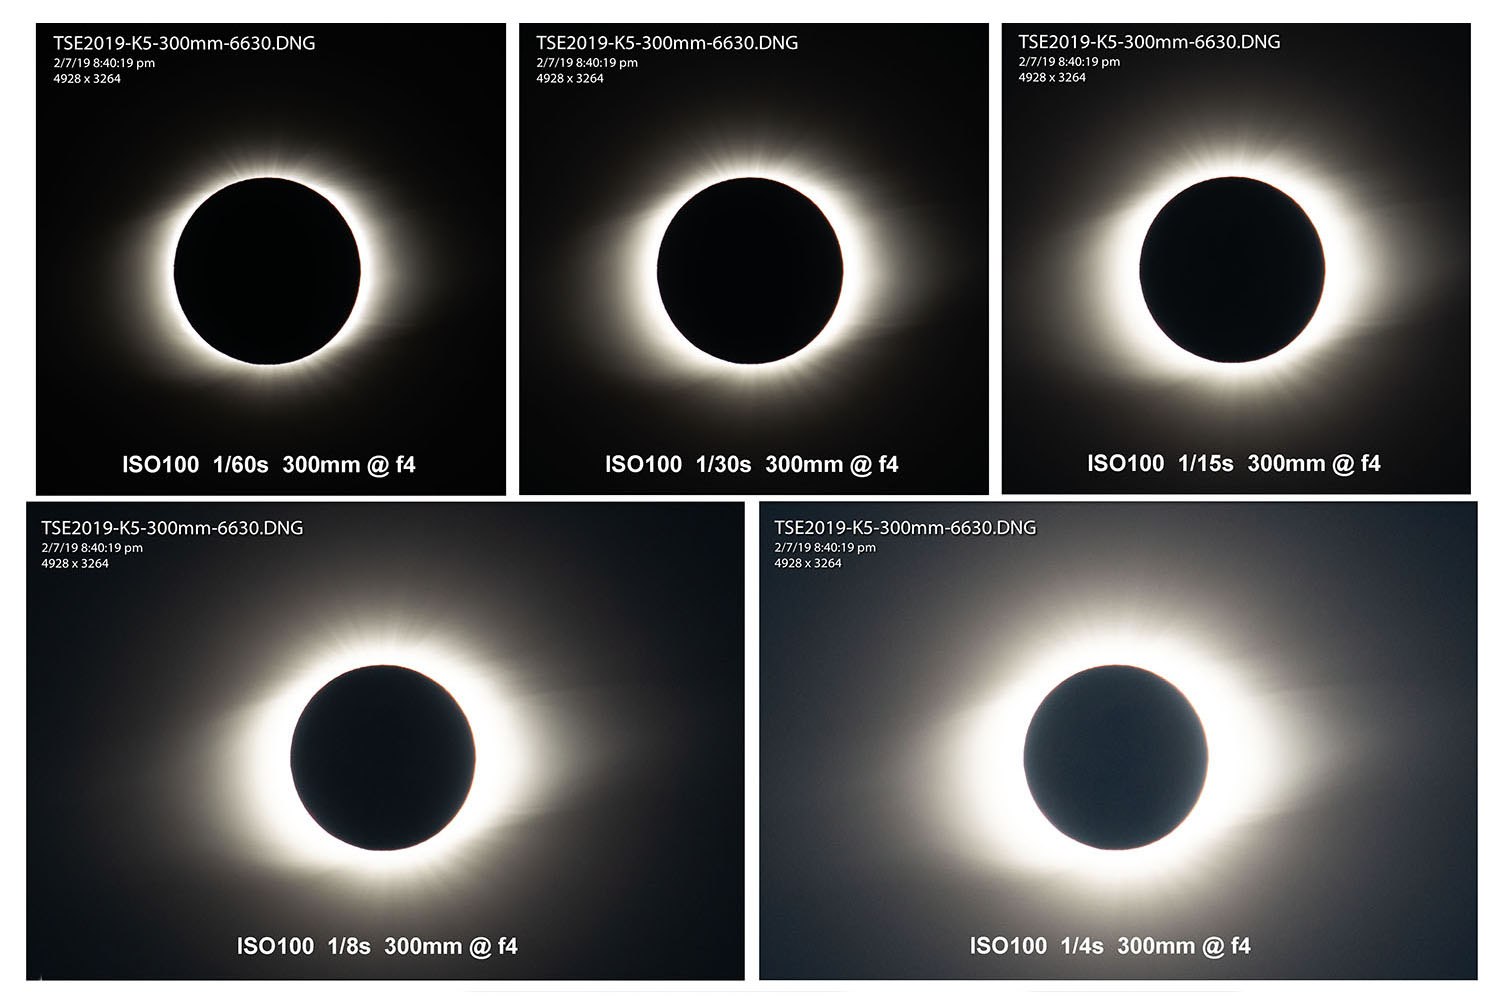
Above: Extent of the corona recorded at a variety of exposures.
This applies to any camera and lens, be it wide-angle, telephoto, or a
telescope. The image size will change with focal length but the extent
of corona measured relative to the diameter of the solar/lunar disc
will remain approximately the same.
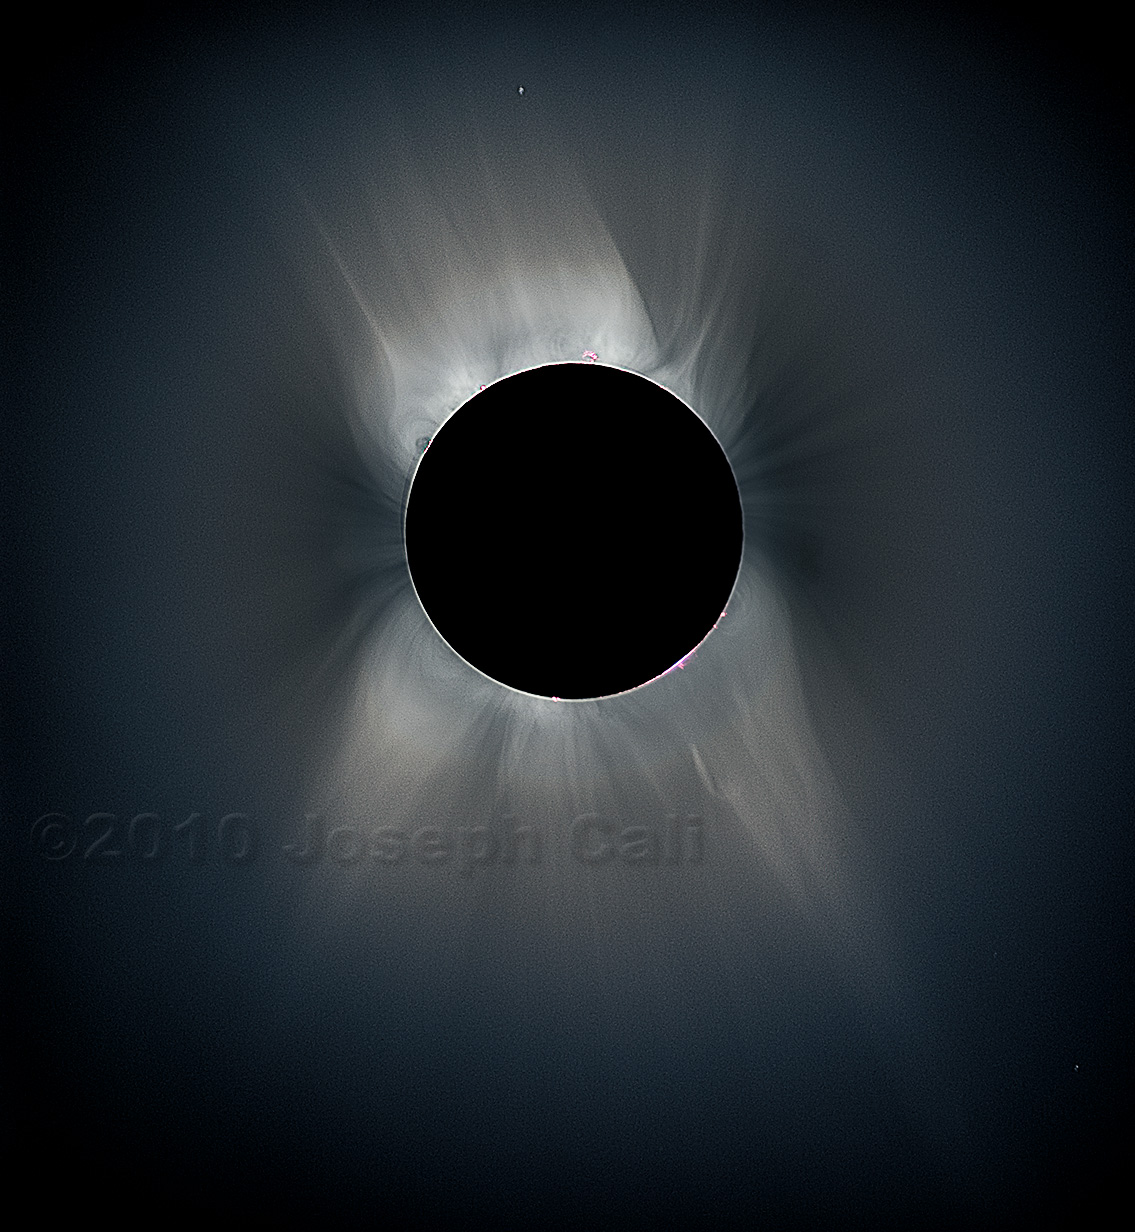
Below: Eclipse composite: This
composite image is made up from 12 different exposures ranging from
1/1000s to 2s at f4 using a Pentax K5 DSLR, Pentax 300mmf4 EDIF lens at
ISO100 combined in Photoshop. Note the blue in the sky is beginning to
show up, and faint coronal streamers extend out to 7 solar radii past the
limb of the Moon, and the cratered lunar surface, lit by light
reflected off the Earth, is showing faintly.
Detailed descriptions and video tutorials of this type of eclipse compositing
& processing by Photoshop Guru Russel Brown can be found at:
http://www.russellbrown.com/tips_tech.html and https://vimeo.com/221971705
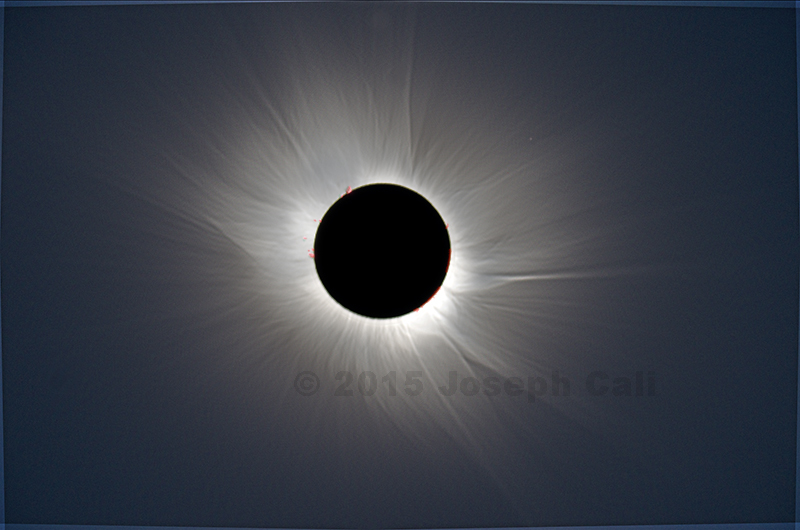
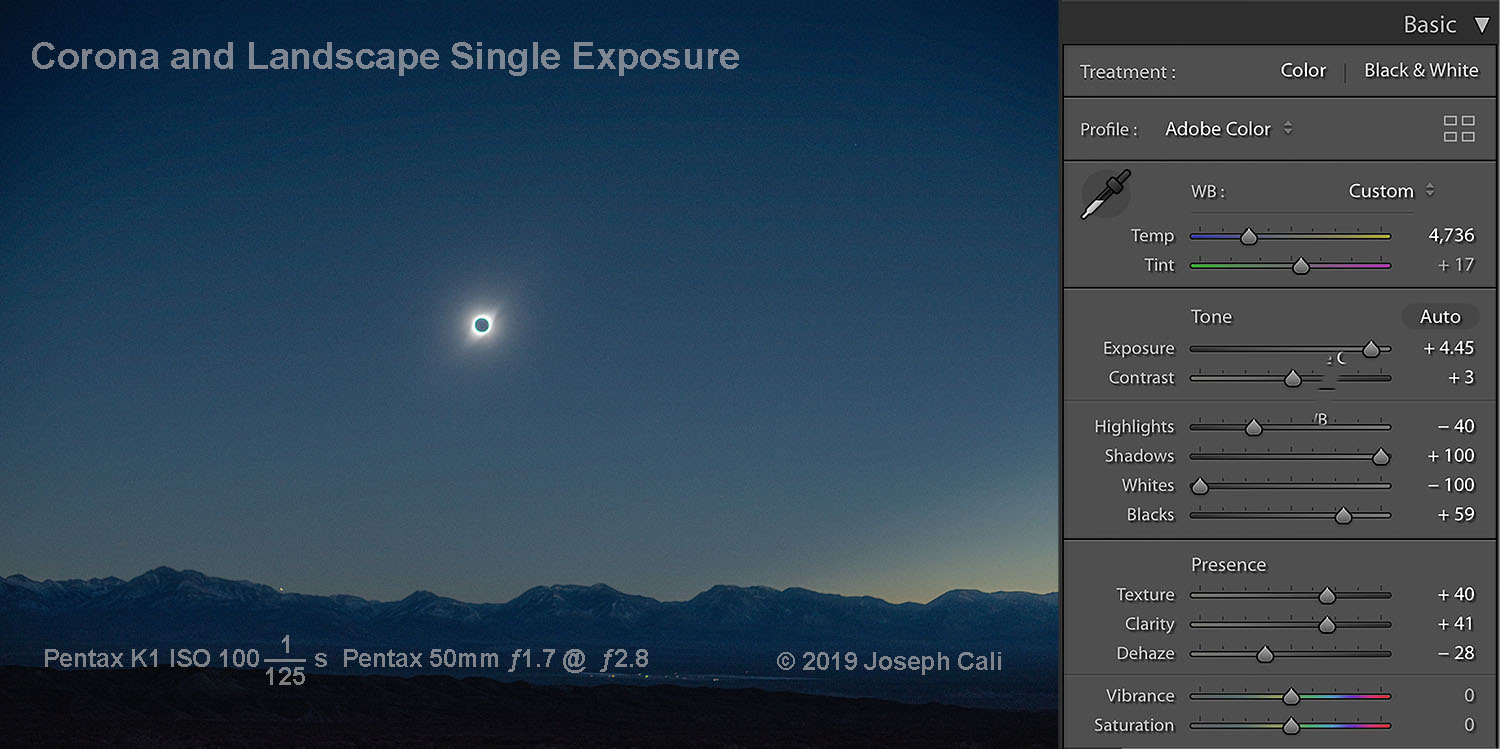
10. A single exposure of 1/60s f5.6 ISO100 can be raw
processed with highlights low, shadows high. Not quite as good as a
full spread of exposures but much easier and gives a respectable result
with minimal work processing the image afterwards.
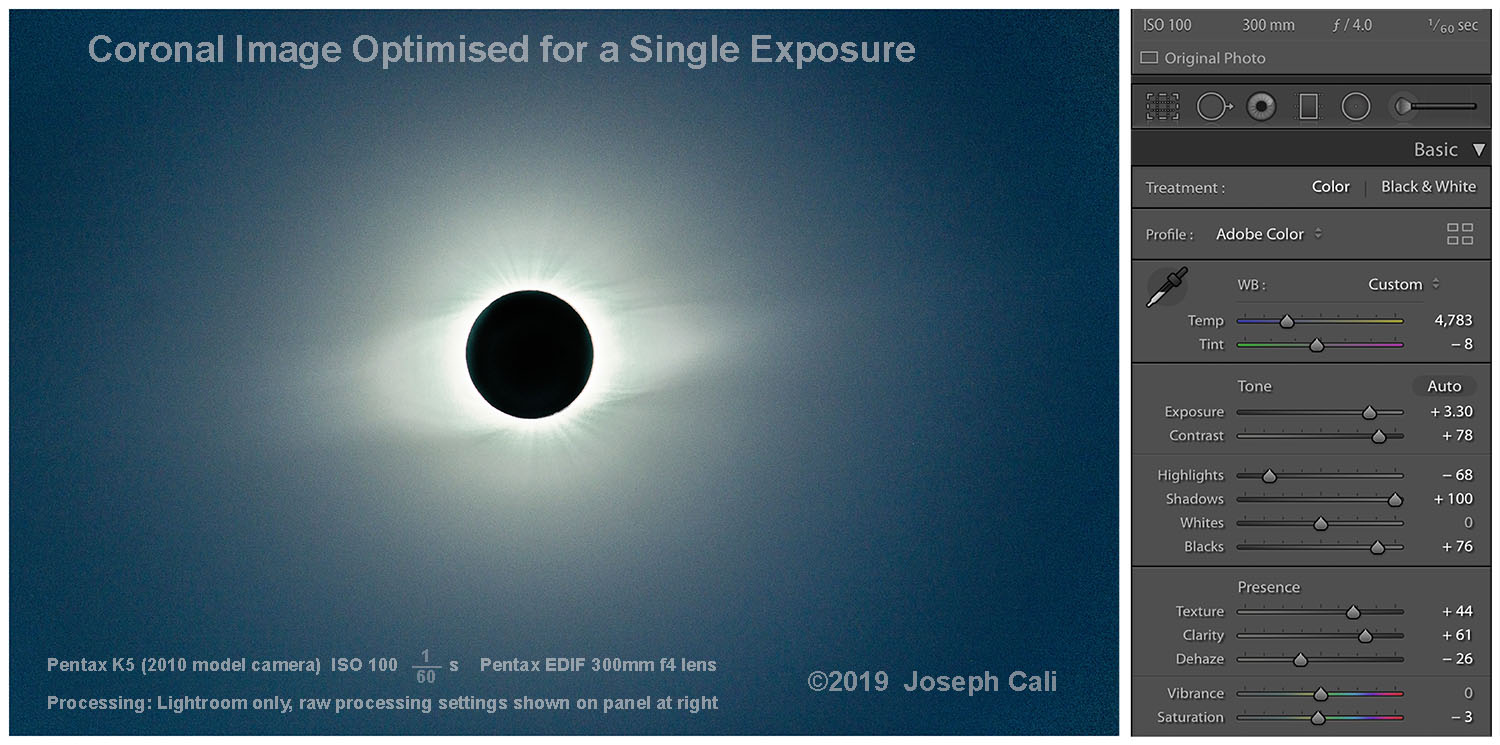
The raw developer settings are shown in the panel on the right in the
image above and that below. Exposure, Contrast, Shadows, Blacks,
Texture and Clarity all UP; Highlights and Dehaze both DOWN. The exact
amount will depend upon your camera. Lens focal length will only change
the size of the solar image however, the expanse of the coronal
streamers relative to the solar disc will be similar to this regardless
of the focal length used. The example below is also captured at
ISO100 but at 1/125th s f2.8 (the same overall exposure value) with a
50mm lens. Note that with identical exposure values and similar
processing the corona extends faintly to approximately 4 x the radius
of the solar disc in both images. Both images were captured
simultaneously at the same eclipse and different cameras used for each
so the processing settings are tweaked for each camera.
|
Wide angle imagery of totality - primary recommendations |
| Equipment: |
Any camera, video mobile phone + wide angle lens. |
|
ISO: |
Set to LOWEST SETTING (ISO 100) |
|
Exposure mode: |
Manual (M)
|
|
Aperture Value (Av): |
ƒ4
|
Exposure Time Value (Tv):
|
1/60s |
|
Support: |
Tripod or clamp-stand. Not hand held! |
|
Process: |
Use above recommendations in raw processor |
|
Wide angle imagery of totality with a smart phone camera or any camera set to auto exposure |
| Equipment: |
Any camera, video mobile phone + wide angle lens. |
|
ISO: |
Set to LOWEST SETTING (ISO 100) |
|
Exposure mode: |
AUTO
|
Exposure Compensation
|
-1.5 eV
|
|
Support: |
Tripod or clamp-stand. Not hand held! |
11. Remember! When photographing a solar eclipse,
it's never safe to look directly at the sun, even when it's partly
covered by the moon. Always use proper filters for eye protection and
camera equipment to avoid eye damage and damage to your camera sensor.
Examples of wide angle photography:-
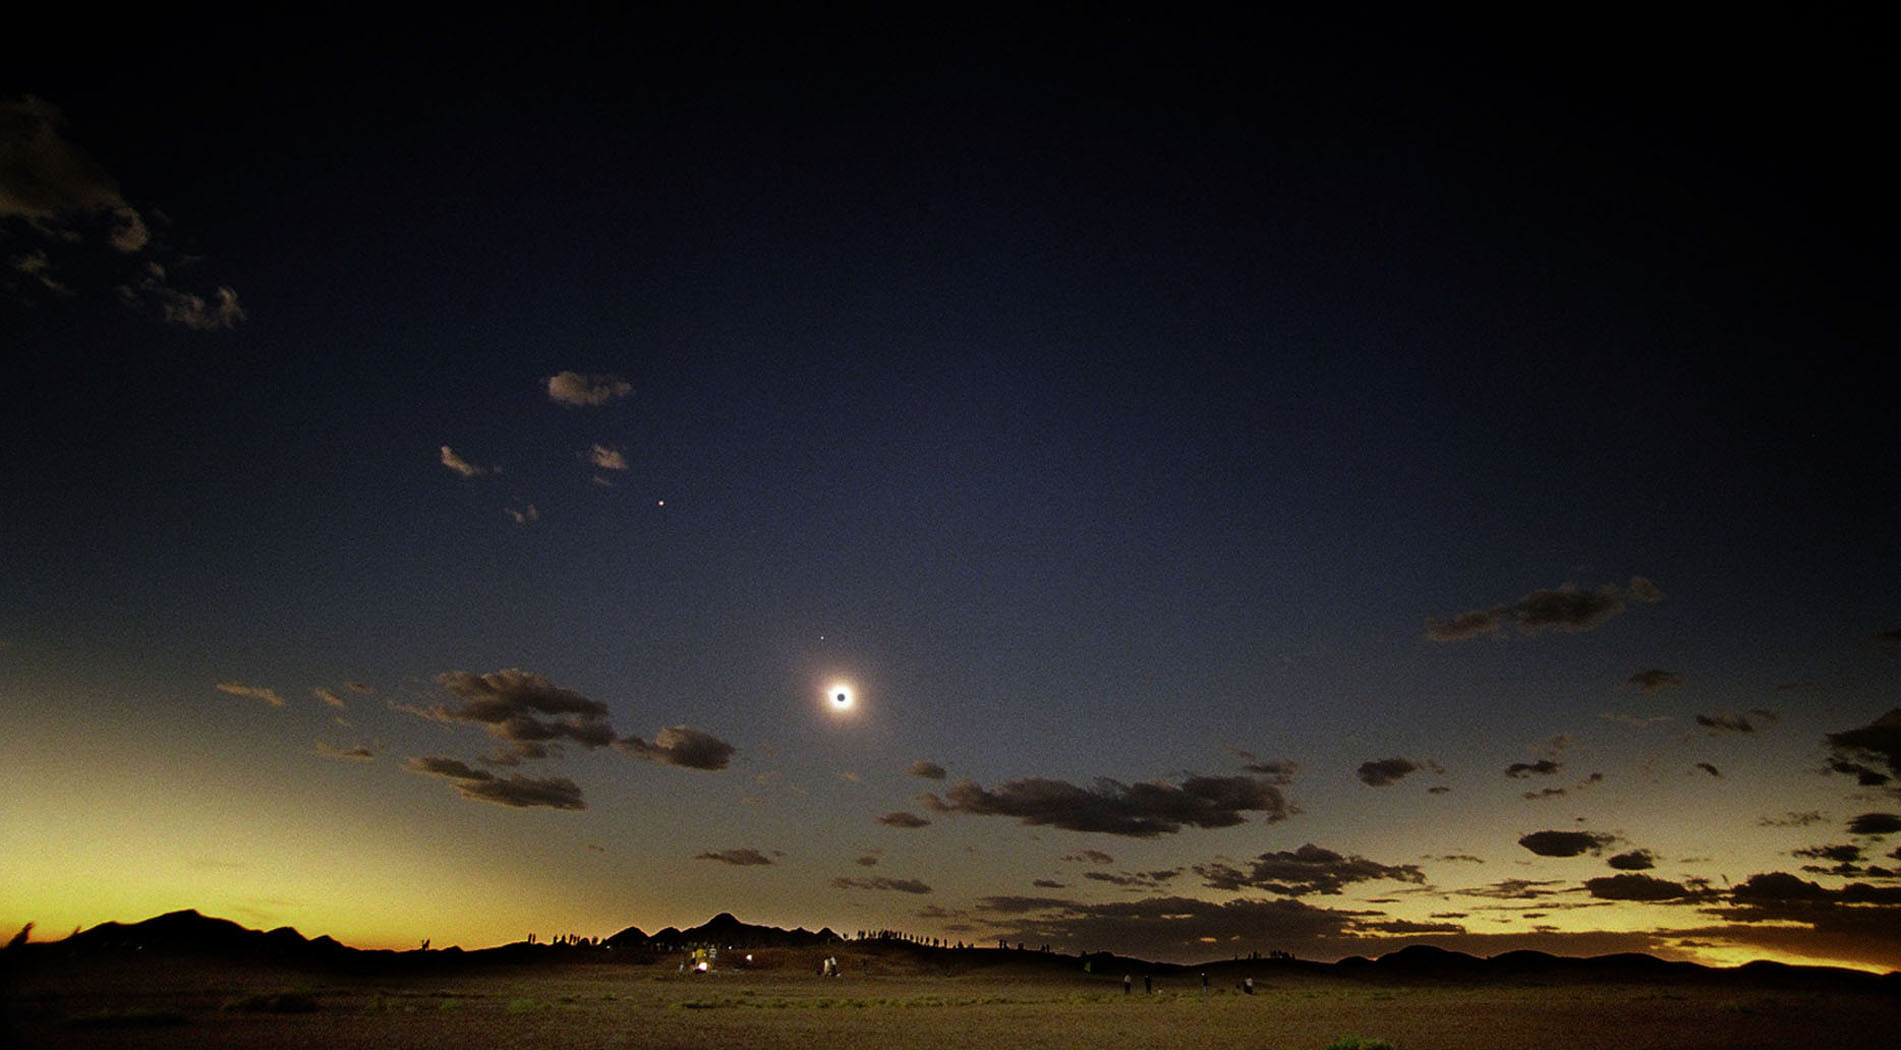
Gansu Province, NW China,
August 2008. A 35mm film camera set to auto, with -1.5eV compensation
was used to capture this dramatic image of the total eclipse. The sand
ridge on the horizon is lined with other eclipse observers and the huge
lunar shadow is engulfing the sky. The trailing edge of the Moon's
shadow was just clearing the horizon as the photo was taken seconds
before the end of totality and you can see the curve of its oval shape
just clearing the horizon. When this edge advances to where the corona
is in this shot, the eclipse is over and it erupts into a spectacular
diamond ring.
|
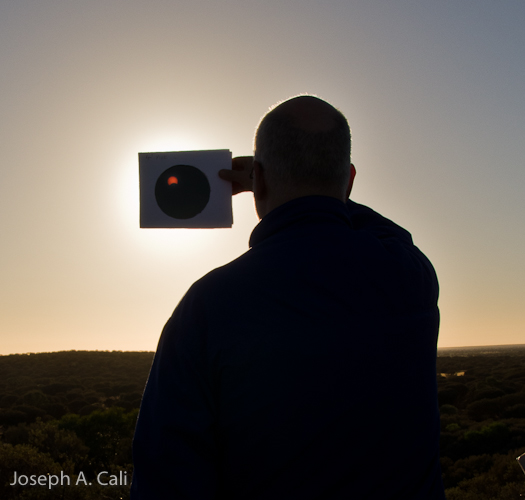
Partial
phase of an annular eclipse, Pilbara, Western Australia, May 2013.
After observing a spectacular annular eclipse rising from the horizon,
the late Bengt Alfredsson casually observes the partial phases as the
eclipse comes to an end. The solar filter evens out the exposure
difference between that blazing sun and the morning desert landscape.
Example of image taken with a mirrorless digital camera, low ISO, Auto
exposure,
compensation -1eV with a standard lens (50mm)
|

The Sun At Totality With Partial Phases At 3 Min Intervals.
The two stars in the upper
right of the frame are Castor and Pollux while the fainter star at the
10 o'clock position is the 2nd magnitude double star Ahlena and above
it to the left is 3,3 magnitude Alzirr and the in the 4:30 position is
3rd magnitude Mebsuta. In addition to the thirty-three partial
eclipse images, five different exposures of totality were radially
composited to show the corona from the limb out to approximately 5
solar radii from the limb. Fortunately, the two tiny clouds at bottom
left were the only two clouds in the sky.
Partial eclipse image sequence:
Pentax K1 full frame DSLR. ISO100
50mm lens f 2.8 1/4000 s (equivalent to 1/1000 s @ f5.6)
Baader Astrosolar V5 solar filter.
1 exposure every 3 minutes for 2 hrs using intervalometer.
Total eclipse image sequence:
Solar filter removed 30s before totality
Pentax K1 full frame DSLR camera 50mm lens f 2.8 ISO 100
HDR composite combining 5 exposures ranging from 1/500 s to ¼ s
Processing: Adobe Lightroom & Photoshop
|
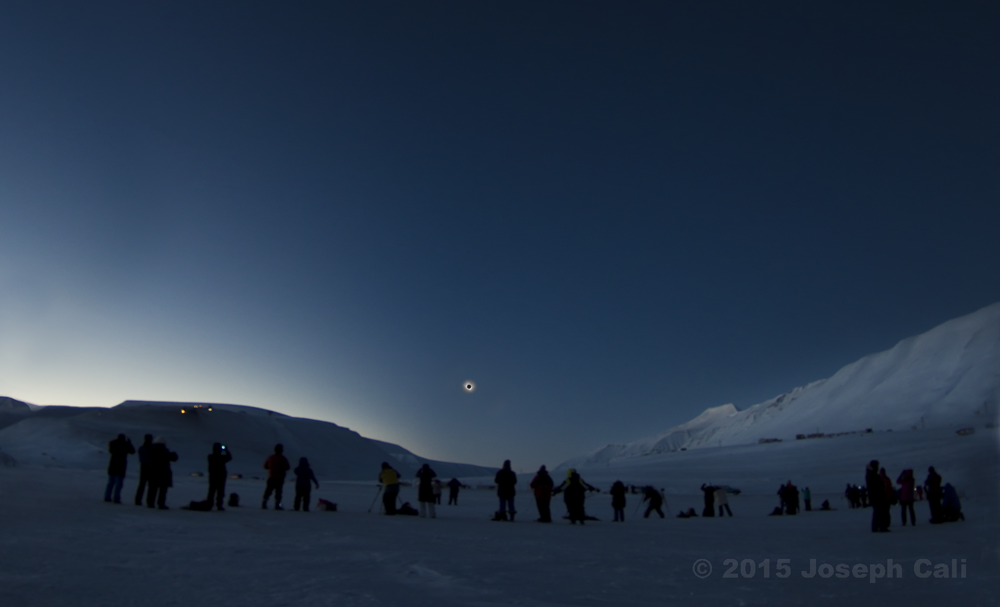
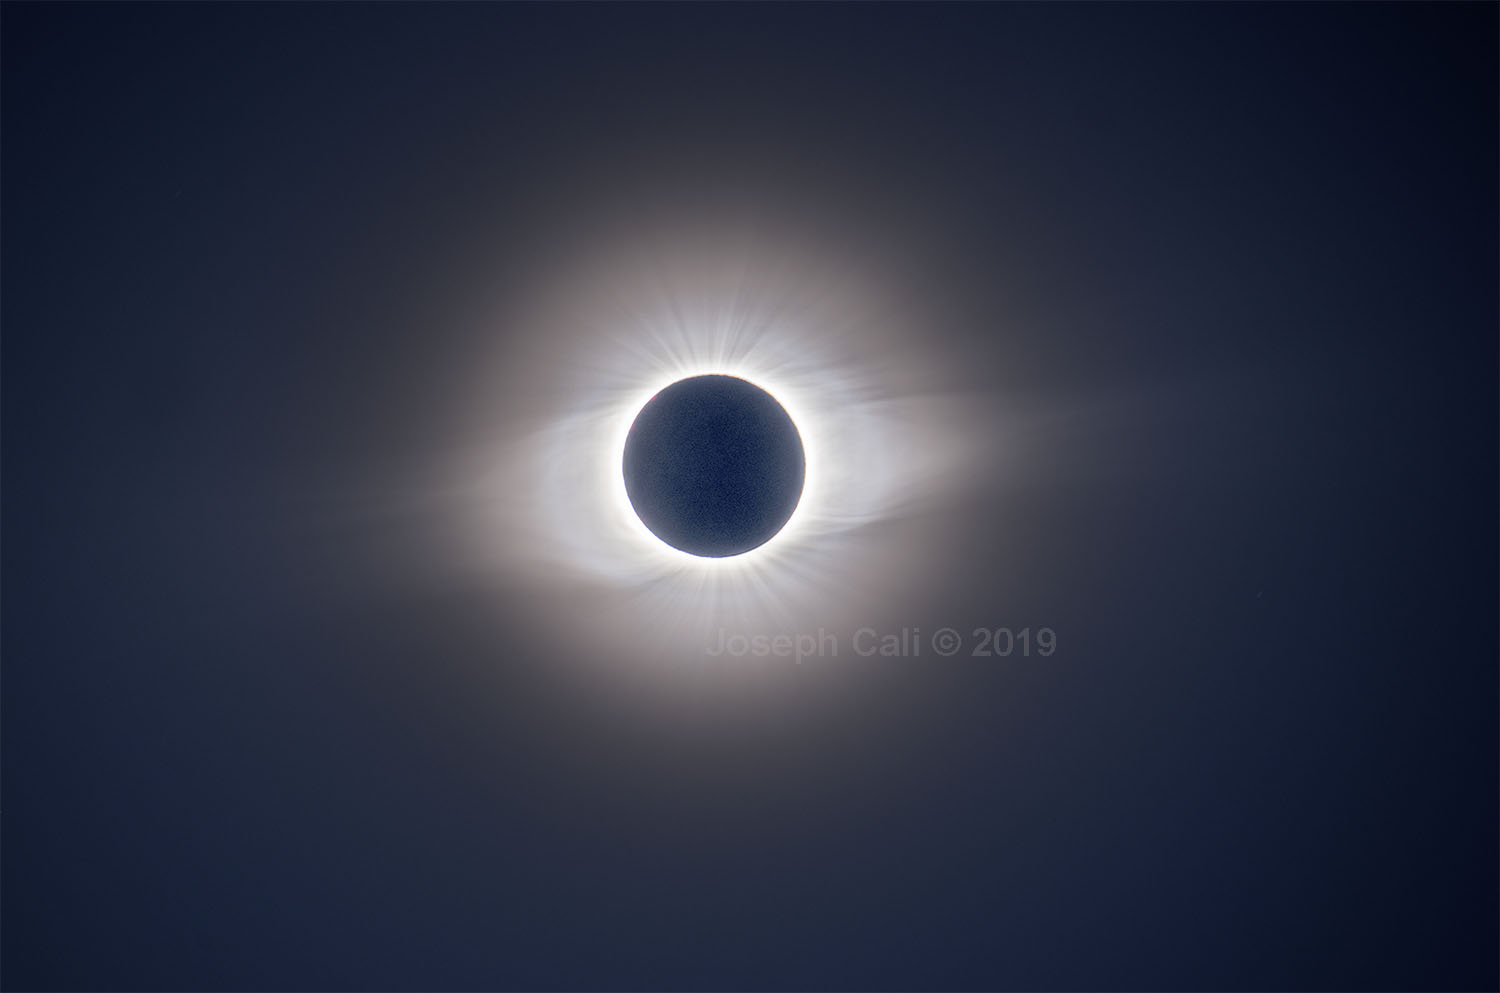
Total Eclipse, March 2015, Longyearbyen, Svalbard, 800km fromthe North pole. Temperature -23oC
. Example of photo taken with a mirrorless digital camera, lSO
100, Auto exposure, compensation -1eV with an ultra-wide-angle
lens (12mm)
|